Week 10
- Tessa Wishart
- Oct 5, 2021
- 15 min read
Updated: Oct 13, 2021
28th September - 4th October
Level 3 Lockdown
I'm starting to reach some deadlines this week! Week 10 is the week I've decided on myself to begin finishing all of my patterns and final toiles for all garments. I'm still feeling quite devastated for having to reduce the collection so significantly, but it's definitely been the right decision.
Finishing Corset Final Toile


One of the only changed I would make in the construction is to change the orientation of the buttonholes to horizontal rather than vertical - as the vertical buttonhole orientation in the toile doesn't add as much stability as I'm needing and the corset is gaping open slightly. I'm intending to use handmade copper buttons - if at all possible given the alert levels we're in - but I think the colour tones along with the van dyke applique will hopefully work really well. I also have great thick copper topstitching thread which I may end up using in some points.
I've designated week 11 to designing all of the subject matter/image transfers for printing given that I will hopefully have finished all the sizes of the pattern pieces before then. But I will use calico scraps from early toiles or paper copies to model out how the applique will sit on the toile corset before I go ahead on the real one. I'm not entirely sure I'll be able to do actual printing until week 12 - as this depends both on accessibility to labs to get the materials/work in there or whether I have to compromise and buy different printing chemicals online, and I need to have all of the final toiles done so I can cut them up for printing on silk scraps and the silk cut out for primary garment printing such as on the slip dress.
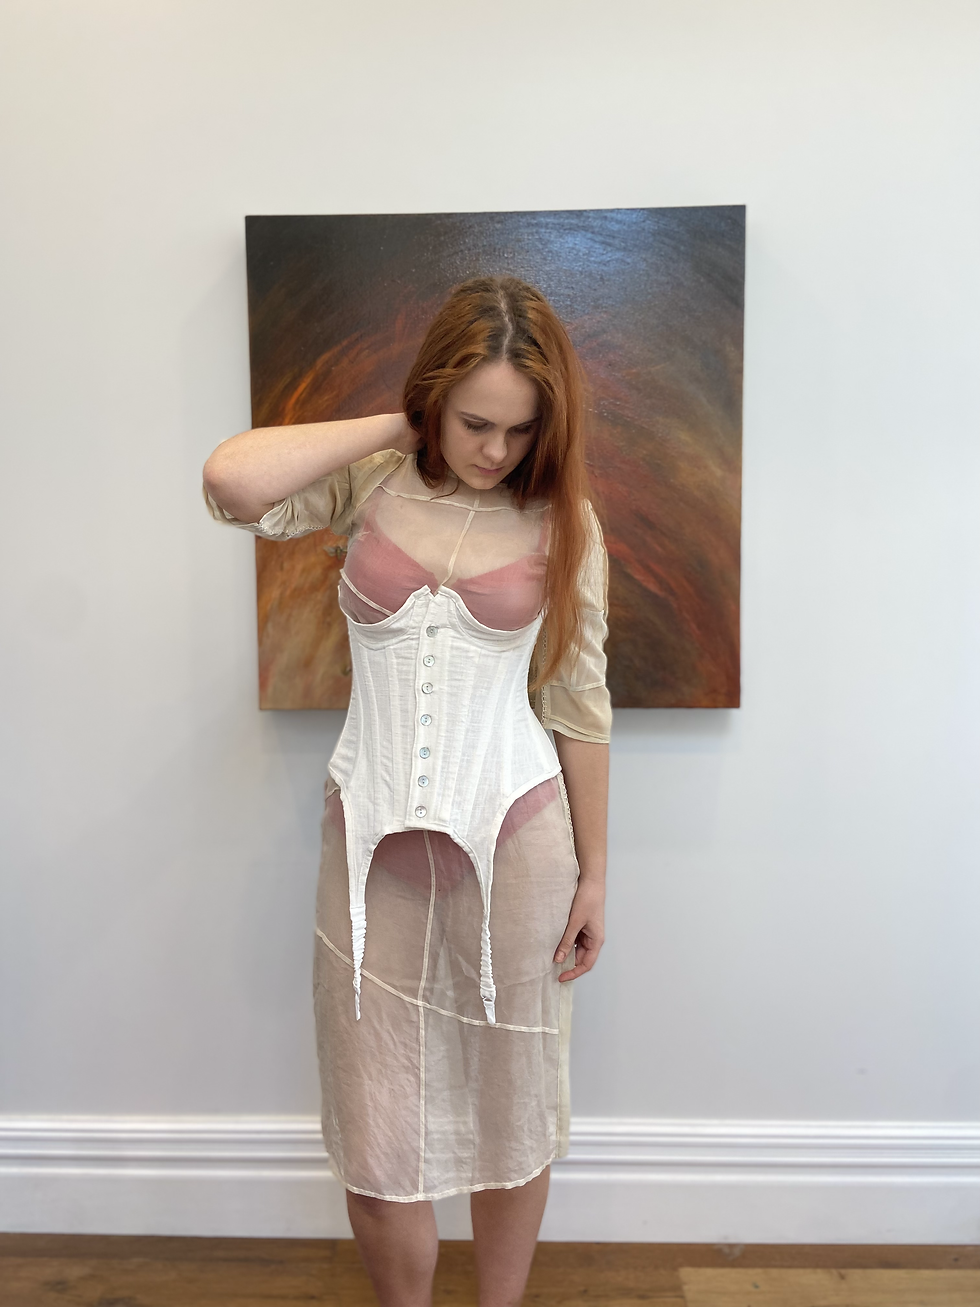
Corset Fit
I've been very happy with these fits and proportions. The changes I've made to the final pattern (not so significant that I feel the need to re-toile) are a 2cm lengthening through the centre of the waist so that the bra cups reach under the bust line better, slight altering of the front bottom curve shape, and a reduction of 1.5cm each side in the centre back - a bigger lacing gap will make for better cinching of the waist when I work on the final corset, and also means that it may better fit smaller sized models as well as myself if I end up being able to shoot the collection on proper models. (Better size flexibility all round.) I have decided that I don't want a lacing modesty panel in the back though.


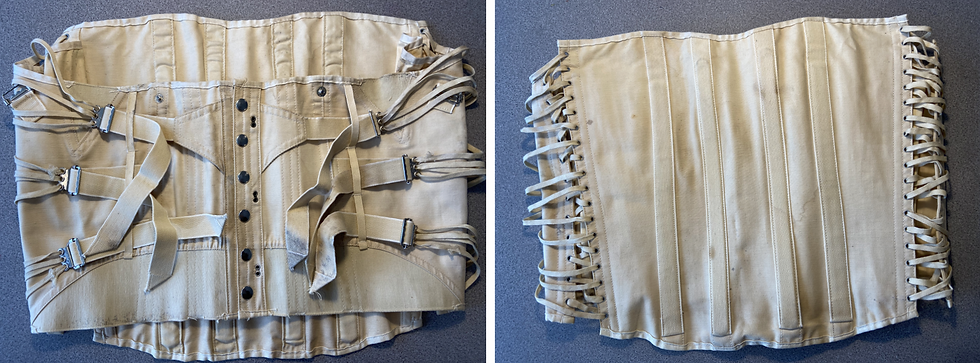
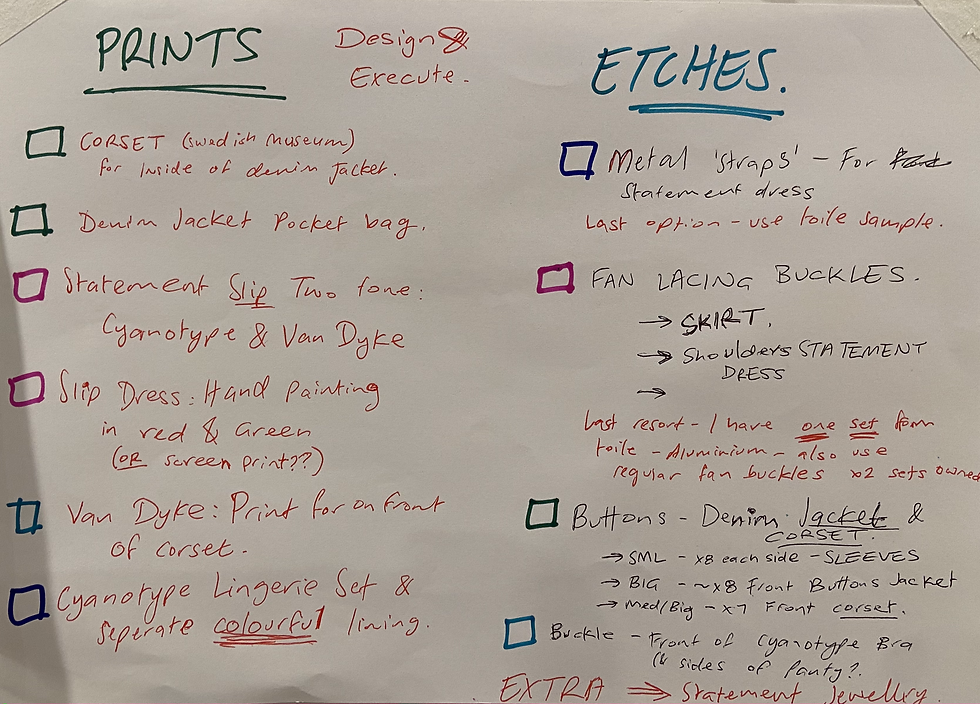
Examining Vintage Fan Laced Corset
Fan Lacing for the corset is honestly something I've been saving till later given that I'm somewhat unsure whether or not I'll get the chance to etch the metal for the buckles or not. (Whereas I'm still somewhat sure I can access print material to do photographic prints at home).
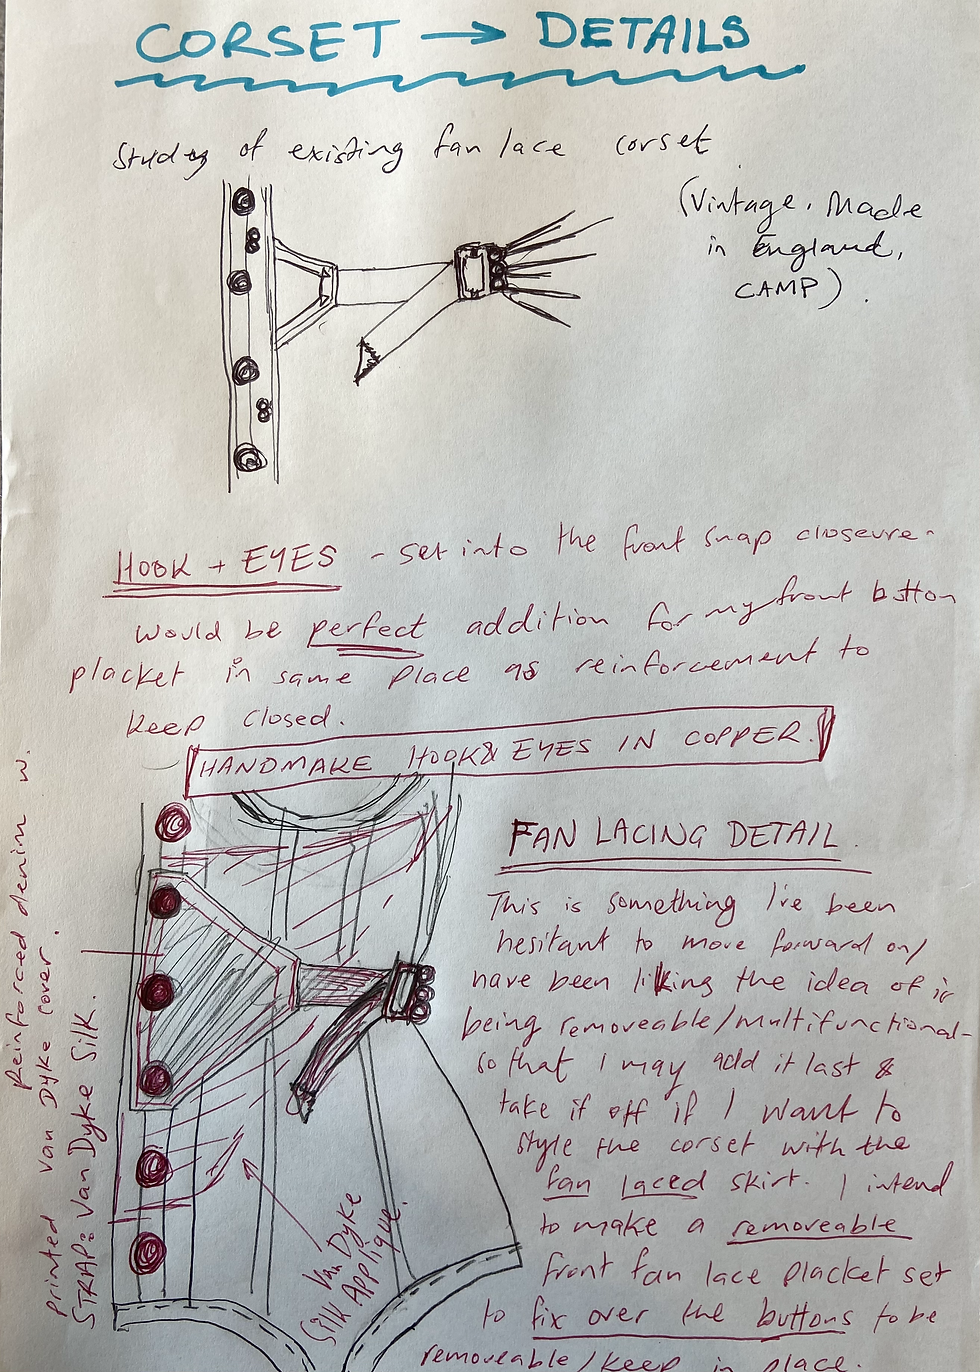
Examining this existing English made vintage corset shows me a few more details I'd wish to add to my own garment, as explained in sketch below. The first of which is hooks and eyes: which will really well stabilise the front closure seam with the buttons and keep the corset closed. These will be handmade from copper wire and handstitched in.
The second is a fan lacking buckle and strap detail to add in as a removable placket which buttons into the front on top of the copper buttons. I really feel this is a great solution for allowing me to format the construction process (I'll make it last and don't have to add if I don't have time) and it makes the piece more style-able and multifunctional. If I don't get the chance to make my copper fan laced buckles, I have some conventional ones I can use or I could use the aluminium sample ones.
Finally, I noticed that in this vintage corset, the centre front edge which sits on top with the snaps doesn't have any edge boning at all, and the under piece only has one strip of boning. It shows that technically it's been okay to reduce the boning for functionality of the buttons/snaps: I have brought stiff straight steel boning for my centre front and back seams, but will check when I'm making the final corset whether or not I actually need to use it or if it will reduce functionality.
Finally, I can't help but note the functionality of how these buckles lace the corset - It's most important to me that my own pieces be functional in cinching the garments rather than just being decorative and making the lacing harder.
(Except for the statement dress with fan laced shoulder details - this is mostly a decorative piece.)


Other added detail:
I'm intending to add small loops on the top inside of the corset cups so that the corset can function as being tied to the removable sleeves with metalwork detail that I'm making for the statement dress. This collection is working out to be very multifunctional and I think that styling the corset with the fawn coloured gauze sleeves, gauze skirt and maybe the blue cyanotype bra and panty set would look really fantastic. This would feature a couple of different metal colours in one styled look but I think it'd be okay.
Denim Jacket Final Toile
Cream Herringbone Denim

Before constructing this piece, I knew that I didn't have any intentions for pattern changes of the first full scale jacket toile - my only concern was the consideration of translation of jacket toile to final corset and whether or not all of the corset pattern pieces would fit or if the corset had to be lengthened. (Possible to do in my zero waste pattern.)
I mapped out how all of the corset pieces may fit on the final pattern, considering symmetry and right sides. I found that to include the exisiting button placket in the front of the corset, I'd either have to lengthen the jacket or include the front yoke seam. I've opted to just include the seam, as this best stands for representation of the upcycling process intentions. Even though I ended up not needing to make any structural changes, it was still important to make the cream denim final corset toile - I seriously needed to be able to judge the proportions of the jacket and see it at the fabric weight that it was intended to be at, and I needed it for this upcycling transition too. Beyond this, I found re-familiarising myself with denim construction practices that I haven't practiced since first year to be incredibly helpful.
I did is little overlocking as possible - except in the top front yoke seam given that this seam will be directly used in the final corset along with the whole front button placket facing. Similarly, I didn't topstitch much except where I needed it to get a structural idea of the garment or better understanding of my construction methods for the final corset.
All in all, I feel that this fabric is slightly more rigid than my actual denim but does well represent the weight, and the toile was worth doing for the sake of the practicing of techniques. I still need to take photos on myself to show the fit on a body, but I'm overall quite happy with it and have identified below the extra details I'll be adding to the final.


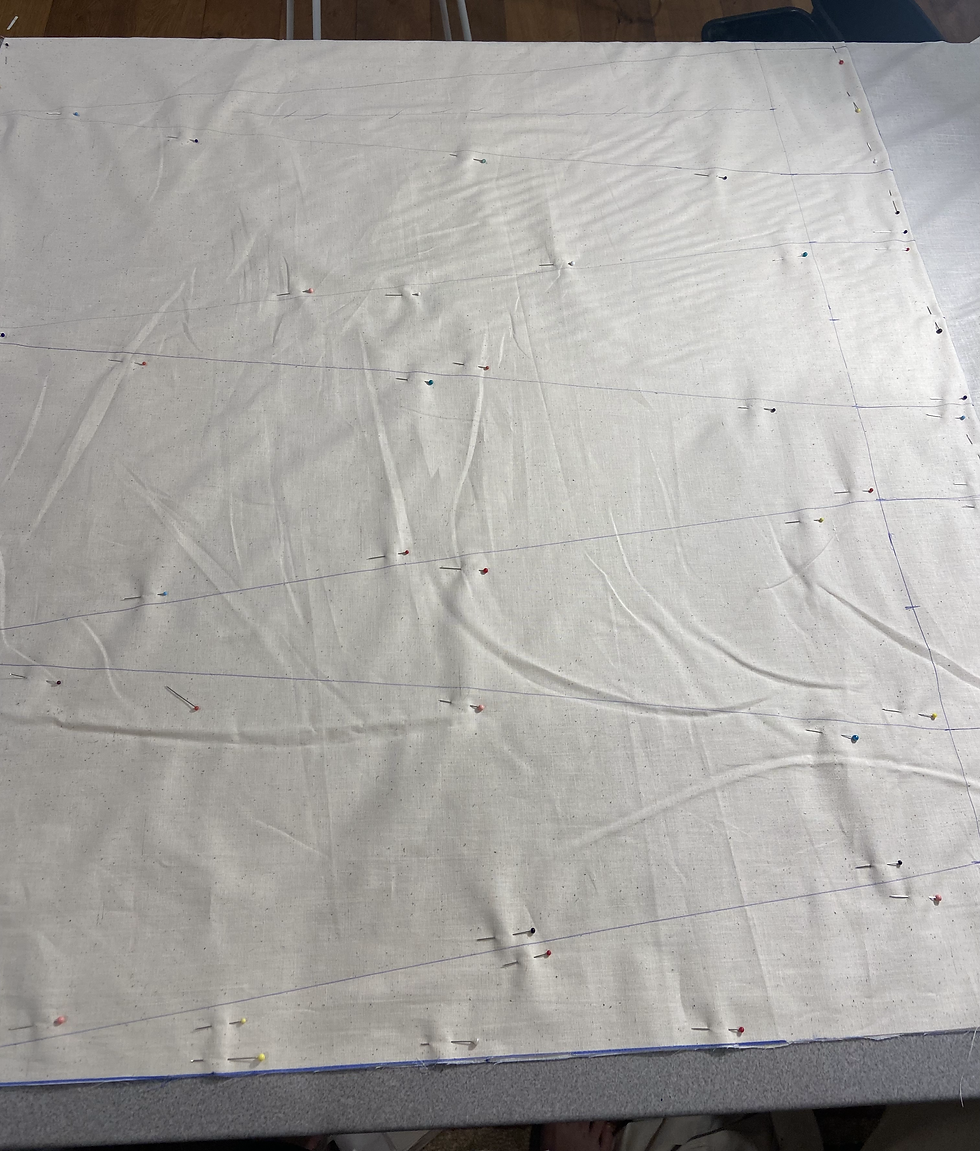
Mapping out corset pattern pieces on the denim jacket zero waste pattern. I would call this an upcycling map, perhaps upcycling cartography, and it's something I'm hoping to draw up on Illustrator if I get time, to use in my branding and lookbook to show the repurposing process during development of the zero waste garments within the collection.
(Note how only the #1 front panel in the last photo is placed on an existing seam (and needs to be re-laid to take the seam allowance of that joined seam into account) - this seam will be overlocked and finished fully to upcycle into the final garment. I've also not factored in things like binding - binding is excellent as it can be lengthened easily and I'll cut it from sections like the collar and waistband.

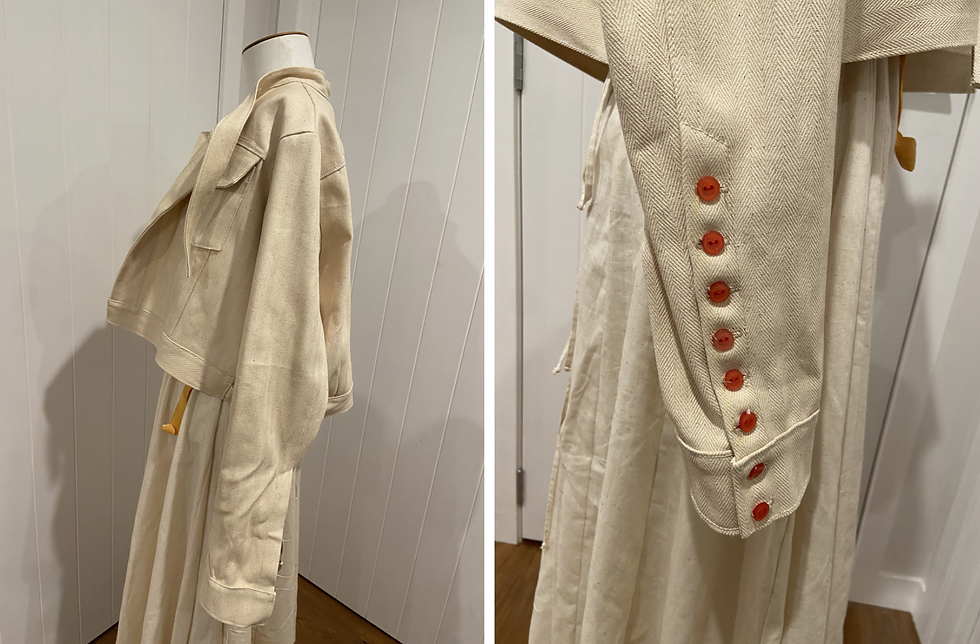
Sleeve Cuff Buttons - The nature of the placket is that I have to sew the sleeve together then add the buttonholes last - but this gave the the chance to experiment with button formats. I'm still slightly unsure about this style with lots of sleeve cuff buttons - particularly because if I'm making my own buttons it gives me lots of work - but I am quite liking the effect and it's something I can decide on last.

Buckles (and buttons) - I'm intending to handmake these out of etched copper to match the fan lacing buckles I'll be making for other garments. (Although I could use conventional hardware like these silver coloured ones if I can't access the etching materials.) I'll be using the same copper etching for all of my buttons hopefully - I'm intent on using copper as it was another technique I featured in my Blue Blood work: copper is the metal colour historically used in denim projects, and I believe that the natural tarnishing/patina building qualities of the copper and the way that it will discolour over time aligns really interestingly with the raw denim principles and wear patterns that tell the story of garment wear patterns.
In my first year denim project I was able to use entirely recycled copper from student scraps, given that I was working at a jewellery course/university. I just don't have that option working from home this year but is certainly something I would've done if I'd had the access.
Waistband Direction: Note the differences in herringbone direction/grain on the waistband: I think the fact that the grain/twill direction of my final denim is more subtle means this won't stand out nearly as much. It's been a reality of the zero waste pattern to have had to format the jacket like this.

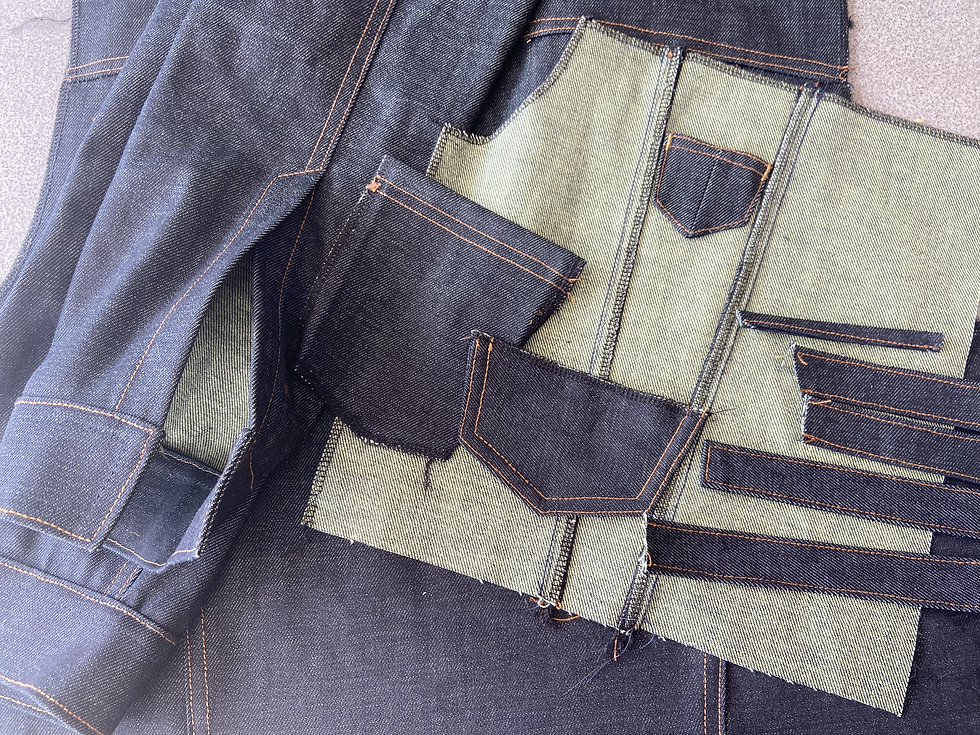
Front Pockets - I did forget to insert the little coin purse before sewing the front pocket, so handstitched this in, but it's given me a good reminder of the construction order for the final garment. I'm happy with the dimensions of the final top pocket - I'm intending to place some sort of subtle embroidery across the front, maybe in a chain stitch, to represent the branding and concept of the collection.


Pocket Bag - The pocket was one of the biggest things not working in my first full scale toile given that it was too small to be functional, although I felt I was moving in the right direction and just didn't have a way to add to the size of it. I've ended up choosing to use those denim pieces as pocket facing sections, and use upcycled scraps of silk as a full pocket lining which will allow the pocket to extend into the front facing and waistband of the jacket and be a lot bigger and more functional.
This sample was made using a scrap of cyanotyped (blueprint) cotton from my past work, however the final piece will be similar to the pocket bag in my year one denim jeans as I've explained in previous weeks. It will explain:
- The raw denim and zero waste principles
- That it's handcrafted in NZ by Tessa Wishart
- Size
- Collection name and garment name if applicable
- Hand crafter copper metal hardware, materials content (cotton and silk)

Worn styled with zero waste skirt toile - This silhouette is almost a bit modern McQueen style to me! But I'm thinking that in the final collection, the fact the the skirt will be a much lighter sheer mesh silk and the jacket a dark indigo denim, the pieces should seperate and work well together. Alternatively the collection could be styled in many other ways.
Starting Making Final Denim Jacket
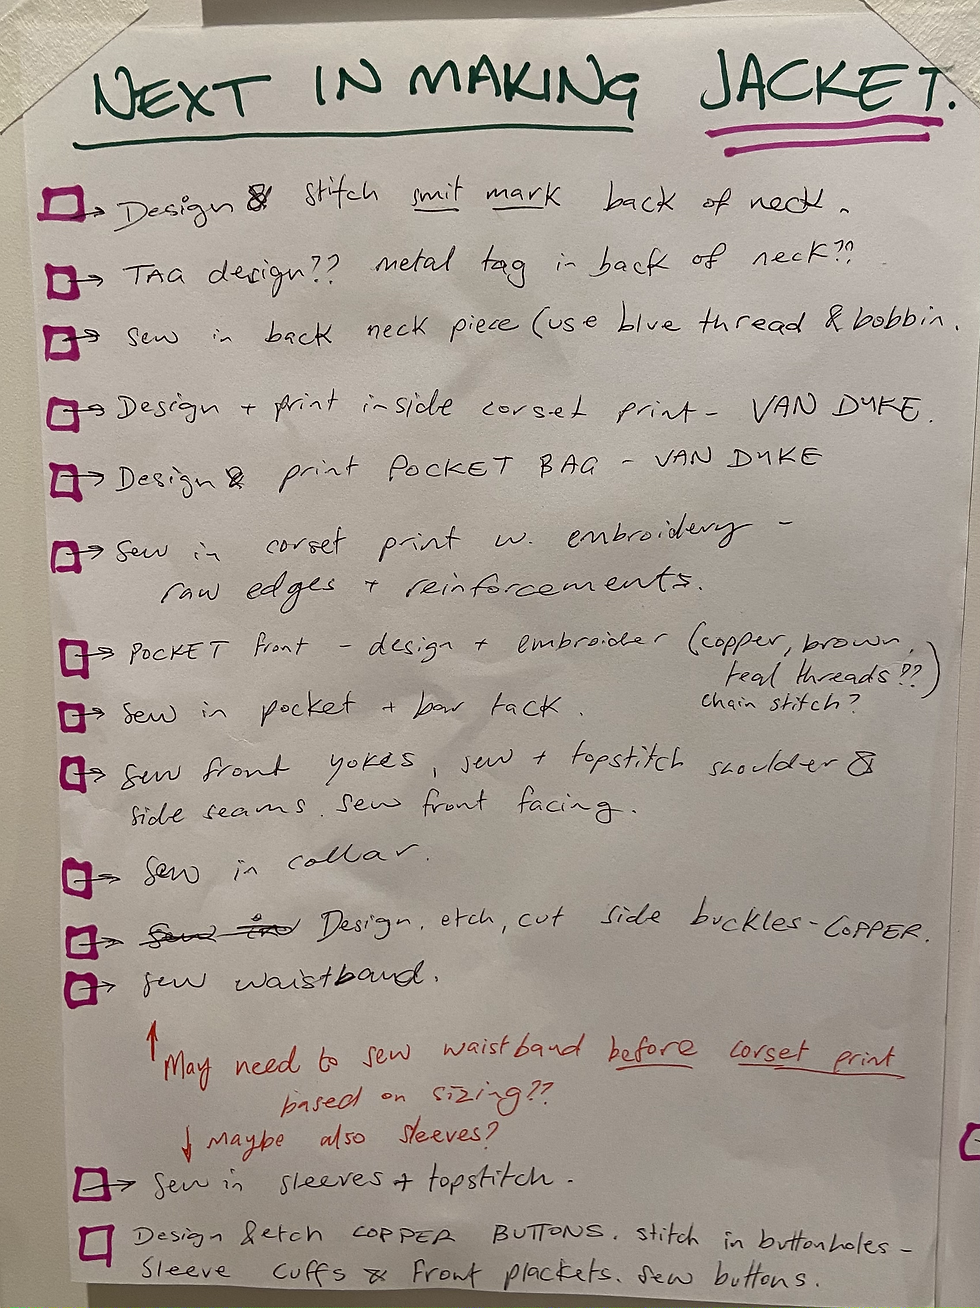
I started making this after finishing the final toile and being happy with the fit, weight of the fabric and jacket proportions. I'm using the indigo cotton denim with green underside, with a thick copper coloured stitching thread, and am really happy with the colour tones and how well they'll work in the rest of the collection. I've also been really pleased at the capability of my sewing machine - it's a new computerised domestic but has been handling the weight of the denim and heavy threads much better than I could've though possible, and is looking just as professional as if I'd done it on an industrial. The only shame is that if I'd been in studio I would've almost entirely been using a flat felled seam denim machine for enclosed seams, as well as a professional twin stitch machine - but as a lockdown concession I've just had to overlock and use my domestic and have been managing well. The machine also does really excellent bar tacks and keyhole buttonholes, so I'm pleased that I could finish the jacket entirely at home aside from the metalwork and printwork.
I've been thoroughly enjoying this process - the methodicism of working with denim at such a high detail feels really beautiful - the high frequency of switching thread weights and colours, considering the construction order and detail of each seam makes me feel most in my element. In some areas, seams must even be hand basted so that the exposed top stitching may be on the correct side. I constructed the jacket as much as possible before having to wait upon my printwork and metalwork. (The pocket bag must be printed and inserted before I can move much further, and I must know dimensions and sizes of buttons for things like buttonholes, and need the buckles before I may insert the waistband.)

Re-Drafting Fan Laced Skirt
Unfortunately when lockdown happened I'd just handed this skirt in for marking, and I've neither had access to the skirt or the pattern.
I'm needing to redraft this skirt for three reasons:
- Mapping out the fabric shows I'm to work with a 110m wide fabric rather than the 130cm guideline I used to draft the first pattern.
- I left the first pattern in uni studio and can't access it
- I've decided to make the collection to fit myself because of how lockdown has played out and prevented me from having models: so I may wish to alter the pattern for a slightly wider waistline.
Note: I'm making in the same gauze silk that I'll use for the Statement Dress draped sleeves, and I have 5.5m (x110 wide) total. I should try to balance the amount of fabric as I don't have any way to get any more as long as we're in level 2. (And it was al limited roll so may not have any more anyway.
- I am still deliberating on whether or not I'll use the bottom ruffle - I could take this off if I find I'm using too much fabric.
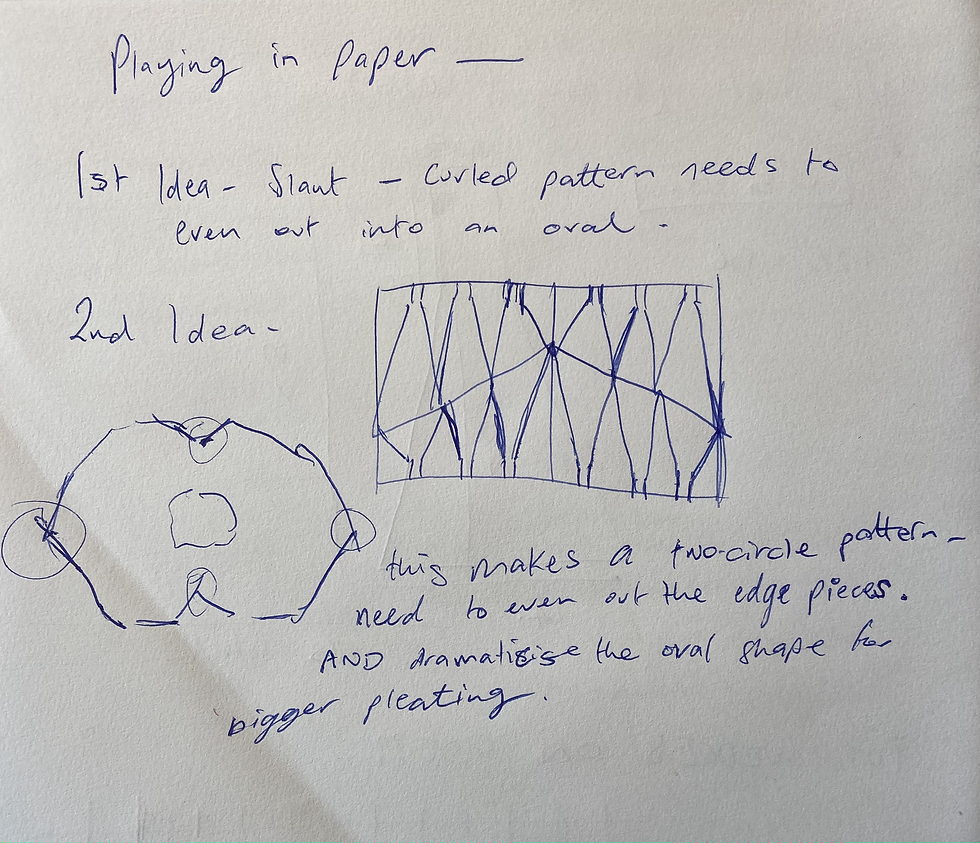
Possibly adding volume
This is somewhat of a basic zero waste pattern of wedges which I'm a little but underwhelmed by, so I did wonder as I was redrafting it if I could add any extra volume as I developed it. I'd focused on the pleat patterns in one of McQueen's dress skirt pattens earlier in the collection, looking at how they extend out over the hips, although the structure of my own silk fabric will be far reduced compared to their dress.
But I did consider lengthening the wedge pattern into an oval, with pleats on each side to even out the length of the finished skirt.


Sample 1 - The idea is there but the pattern isn't mirrored properly to make an oval pattern.
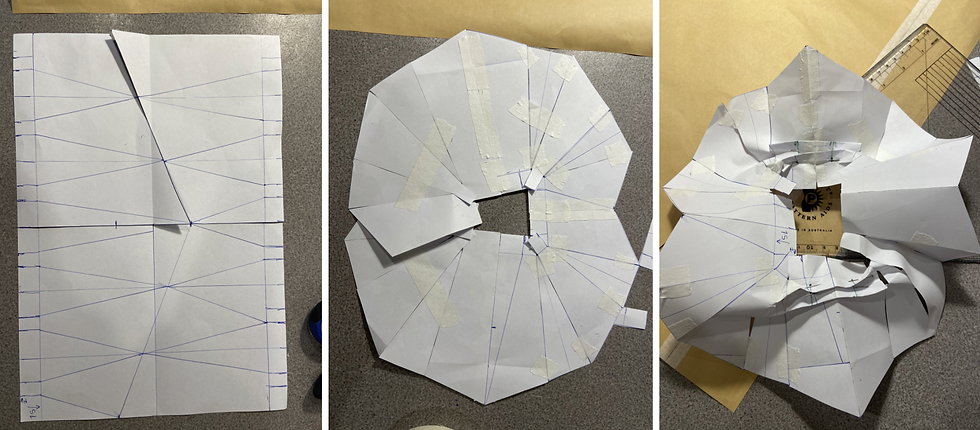
Sample 2 - The mirror is there but the edge long and short pieces in the sides and centre front and back need to be flat so that there isn't points sticking in and out.

Sample 3 - This may work if I hadn't made such a dramatic difference in length?? I'm still not entirely sure about the pleats sitting right though.
Translating to my fabric width - Before I went much further I started to consider if I could get this to work at all and realised that the format of my thinner width fabric (112cm) means I'm planning to layer three sets of four skirt panels. This mirrored pattern isn't possible while doing that - I could cut the mirrored angled sections but there'd be a big gap in fabric when cutting the long and short sections.
In the end I've decided that the effect isn't working as I'd wanted it to and I don't have the time to develop the zero waste pattern experimentally much further - but I have decided to reconstruct the skirt with the wedges positioned on each side rather than between each skirt panel so that the skirt has interesting flare on each side rather than being more of a plain circle skirt. I'm hoping this will sit really well in the silk gauze too, provided that the seams of the joining wedges don't prove to be too thick.
Drafting Skirt Pattern and Toile


The pattern is a section of four skirt panels with triangular wedges between. I simply folded this and cut three times to make up the 12 main panels. The triangle wedges are inserted as a group in each side of the skirt.


Fan Lacing - I tried re-lacing the skirt differently to the first toile, by copying the three hole fan lacing setup on the vintage corset I'd been studying - in this lacing pattern the top and bottom laces pass through the top and bottom holes in one go. I'm still finding this lacing setup just isn't as functional as I'd be wanting though: perhaps because the corset has snaps as a front closure whereas this lacing is to be the main closure and a big feature on the skirt: it's still just too hard to loosen and get off and on so I'll need to work on this lacing pattern a bit further. (Note I used conventional lacing buckles as my samples on the old toile are still in studio)
As in the above images, I also threaded a lace through the front of the buckles rather than a regular strap, and this really contributed to how difficult cinching and unlacing the skirt was. Later, when I changed to using a thick ribbon as a buckle strap instead, things started to work much better. I'm hoping to make these straps really long though (without seams if possible) so they can drape down the same way I'm wanting the straps in the back of the statement dress to sit.

Belt Loops - I put these on the seam to reduce stress on the fabric but they're too bulky on the seam and the position isn't right - I'll move them in a seam towards the centre front on each side.
Fit
I tried this skirt on myself and found that the fit is much larger than I'd expected. (Although can be adjusted by the waist and upper drawstrings. Given that I was hoping to work towards a smaller size scale so that it might fit models too, this shows me that I can certainly cut down to the smaller panel dimensions I'd used in the first skirt toile which I didn't get the chance to try on before lockdown.
Top of skirt - I definitely feel that this section of the skirt is awkward and needs a bit of work - although possibly once I start working in lighter silk fabrics it'll be less bulky along the drawstring gathers. Still, I don't really like the way the top of the skirt sits against the waist and doesn't flatter it so I'll try to fix this in the next toile.
Wedge Panels - I love the dispersal of fullness in the sides but the seams can be slightly bulky. It can also be slightly awkward to insert the halved wedges from the sides if the patterns - I'm decided on inserting these in the centre back of the final toile for a small wedge of fullness there.
Final Toile Fabrics
In my upcycling toile fabric map last week I'd decided to make the final toile of the two tones slip dress in both white silk and red viscose silk fabrics. However, the pattern pieces I'm beginning to generate for the slip dress are showing that I'd need to cut out odd sections of each colour, so it wouldn't be a very zero waste toile if I used alternating colours. I intend to use a panel of red in my final skirt toile instead - the format of this pattern means that I'll be able to cut a section of four skirt panels and side wedges in the red while still being entirely zero waste, and this will work better for me in the long run as I'll have bigger sections of white silk in the slip dress toile to use for printing and upcycling on the corset and denim jacket. I do need to document all of this well in photographs though.
Special concerns in the toile: My main intention in this toile, beyond reducing the panel waist size from the calico toile, is to sew in the same french seams that I'll be using with the final silk gauze - if I find that the french seams are too bulky and disfigure the skirt where the side wedges are I may have to reformat them before I make the final piece.
Bottom Ruffle: I'm also still deciding on the addition of the bottom ruffle or not - but I'm wanting to add it without lengthening the skirt as it is as the calico toile now, so I'll cut down the hem and add the ruffle to make a decision before I move onto the final toile. I do think that it'd sit particularly well in my silk though.
To do in Week 11

Week 11 is the week I'd designated to spend on design and print work. Firstly I need to finish all of the patterns and toiles in the collection that I didn't finish in week 10 - and then I'm in the process of arranging with lab technicians to print some chemicals up for using in etching and printing. (And also pick up the cyanotype bra, metal straps sample and skirt toile I'd left in the staff office in studio)
I also need to buy a few materials of my own - including cyanotype printing chemicals and copper sheet plate to use for my etching practices in making buttons and buckles, and silk paint for hand painting as a substitution for screen print work.
Once I've got these materials and the pattern pieces/dimensions, I will begin designing the imagery and go ahead with printing by the weekend of week 11 so that I can go immediately ahead with making after that. This will include details like pocket bags, the corset print applique for the denim jacket, printed dress, cyanotype bra, etc.
Patterns/ Toiles as priority to finish quickly:
- Statement Dress
- Statement Removable Sleeves
- Two-Colour Printed Slip Dress
- Finish Skirt Final toile
- Lesser Priority - Statement Bra set gloves and garter belt.
Photoshoots - I also will need to take photoshoots (and ideally some video footage) of all of the final toiles - particularly the Primary garments - styled with the secondary garments so that they're properly documented for my lookbook before I deconstruct the toiles in week 12 for making secondary final garments and upcycling.


Comments