Week 8
- Tessa Wishart
- Sep 21, 2021
- 16 min read
Still in lockdown... 🙃
Formative
As per our updated brief, we are required to submit a formative for the start of next week declaring: (Click to view section)
I am writing this formative in the next few sections, as I'm also declaring final designs which I've developed as I've begin to practice different zero waste approaches and undergarment making, gather a collection of fabrics and analyse how these may best be styled together given my lockdown constraints.
Final Developed Designs and Renderings
As I'd been developing my work through process in making zero waste patterns I hadn't really come up with a more finalised range plan until now. I found myself knowing which secondary garments I wanted to make quite instinctively, and then worked backwards to see which primary garments would work with these and see what fabrics I had in inventory or could order now, under the assumption that I just won't get any chance to buy fabrics in personal particularly over at least the next month. Luckily I did have a range of fabrics already brought - the only way I would get into trouble is if I find I haven't brought enough.
Then, I had to work though which primary garment toiles would turn into which secondary garments, and therefore which fabrics I'd use of toiling and finals and making the primary zero waste patterns, given that fabric widths all have to be very similar for this to work and justify itself in sustainability practices. This required a bit of mapping but I'm mostly happy with all of the results.


Primary Garments
(Zero Waste)
Statement Dress

This piece features the fan lacing detail first explored in my skirt across the chest and arms of the dress. This will be made with a mint green viscose silk for the body of the dress and the lengths of the straps, and a translucent fawn coloured gauze for the sleeves. The dress will also feature various pieces of hardware - some iteration of the metal straps I experimented with making earlier in the semester, with the long sleeves attached by handstitch at a crochet border off of the metal. I also intend the sleeves to be possible removable to be more interesting and multifunctional, although this does depend on how the zero waste patternmaking progresses. The chest of the dress will have two fan lacing buckles, like those on the skirt.
I'm quite open to the shape of the body and skirt of the dress altering as I develop it to be zero waste, or alternatively it may just copy the pattern and shape of the slip dress I will develop.
The dress will be styled with the blue cyanotype bra set, which will show through the silk material slightly to add colour.


Fan Laced Skirt
This was one of the first primary toiles I made, and mostly developed as a process of exploring zero waste approach options. I first drafted it to have open sides and an underskirt, with a lot of busy lacing at the back, but I've now reconsidered it and intend the skirt to be made in sheer yellow silk so as to be see through to be worn with a statement corset and black lingerie set. I won't have the open sides anymore, as they were adding stress points to the fabric, and will take out the underskirt. I'm not entirely sure whether or not I want the ruffle on the bottom or not, but will decide this a bit later when I can look the the toiles together in a collection.

Two Toned Print Silk Dress

This is one of the other statement pieces in the primary collection - it is intended as a slip dress with seams dividing it into two sides - one to be printed blue with cyanotype print process, and the other to be printed in the same process in cyanotype brown. I will also use screen printing to add in hints of extra colour - specifically vermillion red and darker green from my colour story. The printing imagery will be life drawing artwork, which I will develop myself as soon as I've created the pattern pieces and know the dimensions. The beauty of this idea is that I can cut from a zero waste piece of white silk and then print the sections after having cut them.
(Note that if I'm unable to access the lab at all this semester because of lockdown, I will still be able to do these photographic printing practices at home, and instead of screen printing I may choose to hand print the material instead. )
The dress is intended to be fully symmetrical as much as possible, with shoulder straps that can be tied and untied - this means that the panels of the dress can be rotated and styles around the body, so the wearer could retie the straps to have one block colour or each side, or the colours split down the centre front and back for each side to be multicoloured. I will try to keep the pattern simple while still having a flattering shape - were I not using zero waste practices, I would cut this slip on the bias. Instead, I will explore on half scale any possible options to insert rotated panels to add more drape (and study the practices of designers such as Madeleine Vionnet) whilst trying to keep the overall dress as flat as possible so I can print on it properly and show off the design.
This piece is styled with the denim jacket, but will not be styled to be worn with any undergarments.

Denim Jacket
The most detailed zero waste piece, which I've already developed and am very happy with - this will be made in dark indigo denim with a green tinted underside, and lined with a 'secondary' applique silk scrap piece of printwork, which will be stitched down to add design lines in subtle thread colour to the outside too.
To be styled with the two toned printed slip dress as above.

Ivory Silk Dress

You can view my slight redevelopment of the design below, but this dress is designed to be one of the more subtle filler pieces in the collection, as it is styled with the statement red lingerie set which has a bra, gloves, panty and garter belt. I wanted a slip dress in a half sheer ivory silk to tease at the bottom half of the lingerie set underneath, while the statement bra is meant to be styled to be worn over the top of the dress.
The design is quite simplistic but is meant to have a centre front panel (now choosing to use an insertion embroider stitch to join this to the rest of the garment) which is printed on the inside with blue linework using the cyanotype printing process. The print on the inside really teases at what is within the clothing and the lingerie and body underneath, but will still be able to seen well enough on the outside as the fabric is slightly sheer. If I need to, I can entirely copy the pattern from my split silk dress and only alter it slightly, in order to save time.
Secondary Garments
(Upcycled from toiles)
Statement Lingerie Set

This set contains a pair of long gloves, attached to the main bra (removable) at the front and back strap rings. The main bra is adorned with hand crocheted lace along the inside of the cups, which will also be used to border the tops of the gloves. The gloves will be either embroidered or cyanotype printed with vein like line designs running down the length of them.
The set also has a strappy red knicker, and garter belt. (Possibly also adorned with crochet lace, depending on the toile.) To be paired with copper coloured fastenings and copper metalwork (where applicable). The set is styled with the ivory silk dress, with the bra meant to be worn on top.


Cyanotype Bra and Panty Set
This set was designed though process as I made the toile first using a buckle and printed silk scraps I've developed in my minor last sem. It's quite a detail heavy piece, with contrasting print colour inside cups too. The final piece will be made in cream silk, but with different buckle and print imagery. The panty pattern will be the same as the statement bra above, although may have different straps instead.
The set will be styled with the statement dress.


Black Ruched Bra and Panty Set
This set is designed to be quite subtle, made from black cotton silk. The bra is a balconette/demi cup style with a ruched front and underwire. The lining of the bra is intended to be a brightly colourful print on white silk scraps. The knicker is a wide rucked bikini shape with (encased) elastic to create the lettuce leaf edges. The centre front will have another scrap of colourful silk design, attached in an applique style. The double strap may have a coloured silk bow on it too.
This is to be styled with the cream statement corset and sheer yellow silk skirt with fan lacing.

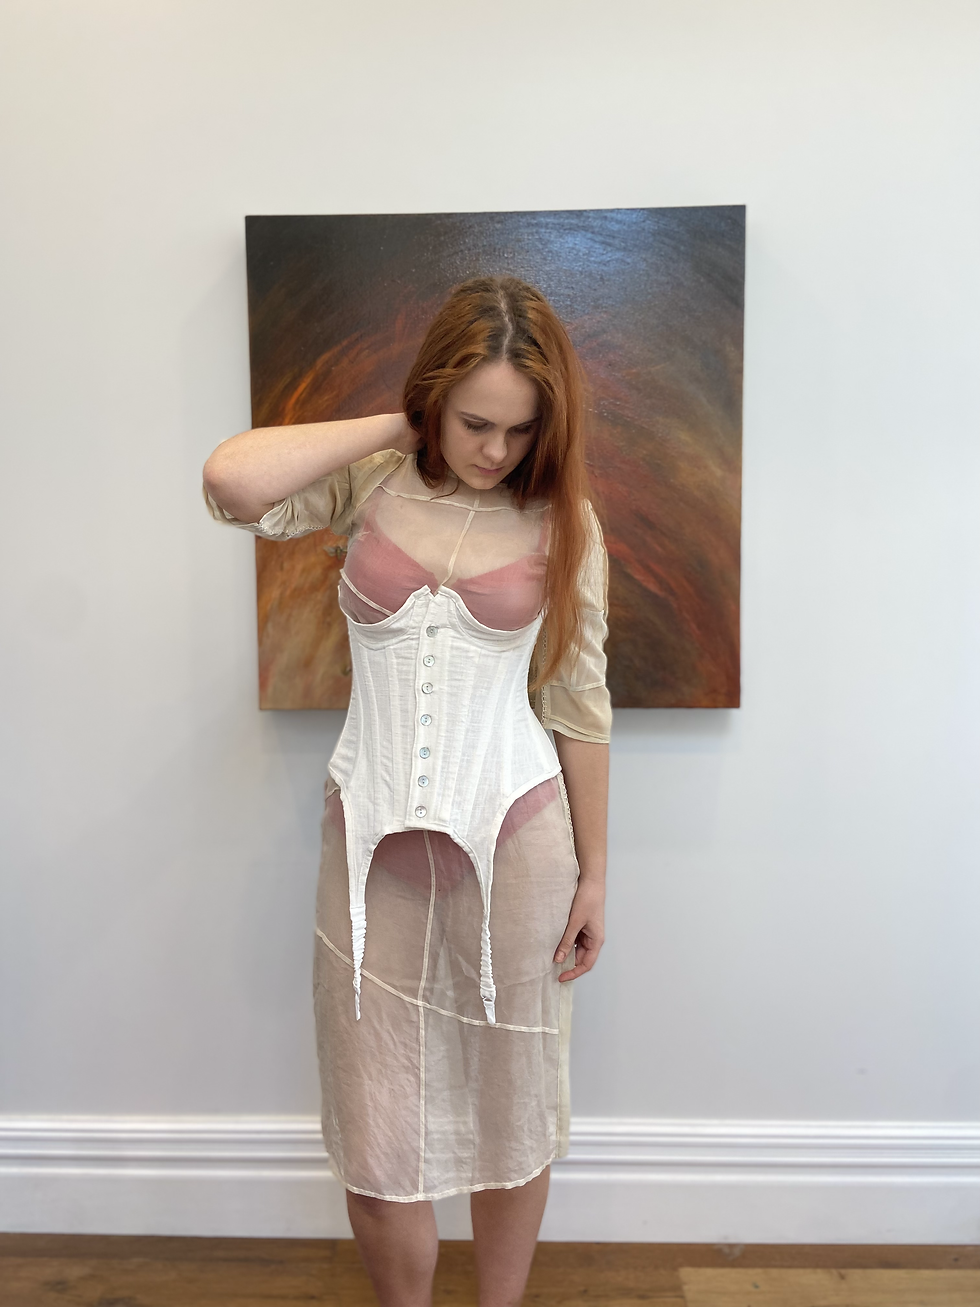
Cream Statement Corset
Cut to be an underbust corset with a quarter cup, this piece will have garter belt straps and will also have a piece of van dyke printed silk applique across the front. It may also possibly have contrast coloured details such as conventional 'flossing', such as in a crimson red colour.
I will sew this using thick cream topstitching thread and at times use seams mimicking those in traditional denim garments. As this is a very thick fabric, the corset will be unlined but may have some form of binding boning channeling, or I may add extra SA to sew the boning within the seams. I've not yet decided whether the piece will have conventional back lacing or some other type of closure, as it will be styled with the silk fan laced skirt and I want the lacing of the corset to be more subtle so not overpowering.
In an update of the design, I now intend to make the buttons of the denim jacket final toile a main front feature of the corset - adding twice as many buttons bust to fill out the space. This allows me to really play up the fact that it's an upcycling exercise, and feature details of the original garment.

Map of Final and Toile Fabrics

Which I intend to use for final primary fabrics, and which materials I will use for final primary toiles, to then be upcycled into secondary undergarments.
Note that I've tried to keep widths of toile and final fabrics the same, but some toile fabrics are wider and these excess strips down the side of the fabric when the ZW primary pattern is cut can simply be used in the undergarments during the upcycling process, and would most specifically work well as binding or similar.
This first map was almost working until I realised I hadn't accounted for the fan laced silk skirt on the far right, which I will certainly need one more toile in before a final. The fact that I only needed 4 main fabrics for the Secondary garments but had 5 Primary garments was throwing me off until I realised that I'd brought a length of 'firetruck red Annabelle' silk viscose matching the mint and ivory colours, which I could use in the statement bra ensemble as a block colour to add stability to the piece and use for the thin straps which would work far better than the wide woven gauze. This let me remake the fabric map to balance out perfectly so that I didn't need to add another secondary garment.

(Note that I'm making all of the secondary garment toiles using fabrics and scraps which are already in my at home collection, and I'm making them all to be wearable and functional (also using conventional elastics) in order to justify the toiles in sustainability terms.)
Materials I have access to:
I have already brought all of the above materials, and also have access to the threads and elastics I need.
As I'm choosing to use my domestic machine to bind eyelet holes to be more sustainable, I don't need any extra hardware in that area. The only thing I may find myself needing is undergarment pieces like rings and sliders, and hook and eye clasps, although I do have some at home. I can order these from https://nelliejoans.co.nz/
My only other materials/equipment that I don't yet have is the metal sheets that I intend to use to create metalwork pieces within the collection - I still need more design in this area but at this point I'm envisioning using a combination of aluminium and copper - copper in particular creates really interesting patina and wear over time so I'm interested to play with this.
The level of metalwork that I'll be able to incorporate into the collection is really something that I'm waiting on to see based on how lockdown progresses in the next few weeks. There are a lot of other garments I can make first whilst I'm waiting on this, and I can also replace the metalwork details with conventional lingerie hardware if I do get to the point where I'm not able to do this at all.
Updated Timetable
This is my timetable so far - I haven't worked in any studio time or lab allowance yet, as we're going to be in level 3 from at least week 9-week 11. I have spoken to my lab tech about possibly getting print materials in week 3, so I'm sure I can make this work whether I have to work from home or in the labs.
At this stage I'm confident to be able to have the time to develop and make the whole collection, however I will reevaluate this by week 11 if I'm not tracking as needed.

ONGOING RESEARCH
A FOLK HORROR FAIRYTALE
MAISON MARGIELA AW21
Having almost finalised on these first designs and renderings, I watched the 'A Folk Horror Fairytale' documentary by Margiela's John Galliano and was inspired all over again. Some of the crafts and techniques matched and aligned remarkably strongly with the techniques and designs I was already working on, and inspiration from others have led me to consider and redesign pieces within my collection.
Pieces I was most inspired by:

Coat Lining

Whilst explaining this piece, Galliano says about the lining: 'It's almost a chart of geographical wonders in the lining'. This quote is beautiful and something I'd absolutely reference in my lookbook - I thing the fact that I'm 'mapping' a relationship between clothing and the body, and exploring the feminine form whilst creating my own printed lining for my denim jacket makes this all the more relevant and perfect.

I'm obsessed with this garment and couldn't believe how similar it was to the idea I'd already begun developing of a printed lining - even down to having the same colour scheme - (my design to be then sewn down over design lines to create a subtle pattern affect on the other side to aid with wear patterns.) I did like how the pattern was cut to reveal the colours underneath, as this is my handcraft obsessed self coming to the surface... but I think the applique, printwork and stitch techniques will have to be enough for now!
Blue Knitwear
Galliano explained how this piece was inspired by a 'Delft Blue' idea, and that he asked workers to create little samples of embroidery on knit squared which he might use in the knitwear at a later date. However, he explained how he then loved the effect so much that the pieces were then crocheted together in cream coloured thread. I absolutely love this effect - the contrast of colour which is so similar to cyanotype, the joining effect and negative space it teases (in past work I've used a fagoting stitch or insertion stitch to join down the sides of garments), the patchwork style which I used in a cyanotype print piece last year.
I also love the fact that this in itself is a zero waste piece!!! Knitwear is inherently very low waste, as are the crochet and embroidery techniques - but even were the squares cut from a cut-and-sew fabric they would be low waste for having been geometric. It also bears heavy similarity to the square shaped kimono designs used historically in cultural garments which were inherently very sustainable and low waste. Strip cuts or geometric styles like this were something I debated using as a zero waste design method in the first few weeks, but I can now consider these to be something I might like to return to as a way to enhance my dress designs.

Delft Blue
Galliano explained how he took a strong amount of inspiration from 'Delft Blue' for the patchworked embroidery knitwear look. Delft Blue originates from the Netherlands, and is tin-glazed pottery adorned in white with various blue patterns and illustrations. The vibrant blue has made me draw a clear comparison to my own cyanotype patterns.
Not only does Delft Blue bear similarities to the cyanotype technique I'm intending to use, but I may also relate to more conventional blue and white porcelain pottery, originating form various countries all over Asia from the 14th century onwards. Finally, I must consider the origins of cyanotype itself. Invented by john Herschel in 1842, cyanotype technology was very frequently used in making engineering and architecture blueprints, which print in negative with solid blue backgrounds and white thin linework. Additionally, Anna Atkins, a 19th century botanist pioneered the method of using botany samples in the light sensitive

photographic printing process, as a way of record keeping.
My own cyanotype work last semester...


I then went on to consider that I wanted to alter the design of my ivory silk plain dress - this was the thing I designed last, modelled after the split toned cyanotype/van dyke print slip dress, as a method to reduce pattern making. However, I did feel underwhelmed by the dress and very open to waiting and seeing if a stronger design might develop later - it still had to be subtle enough so as not to distract from the statement lingerie set which it's styled with.
I had originally planed to print cyanotype blue linework on the centre vertical panel down the inside, so that purposely only a faint and subtle line is seen from the outside, which really teases the invitation to look under/inside/within the dress and at the comprehensively designed and crafted lingerie set underneath. I like the fact that the silk is only half transparent - I will photograph all of the lingerie itself so I'm not worried about it not being seen, so I like this sense of teasing. (Although the bra is meant to be worn over the dress, which is one of the reasons why the design is simplistic).
I'm now developing the design a bit more in inspiration of Margiela to have the cyanotype interior front panel joined to the other using an insertion stitch (used in my past work) using a light mint coloured thin wool. I'm also wondering about the possibility of constructing the dress using seamwork to make it completely reversible and able to be turned inside out, so that this cyanotype panel might be a feature instead - although this would entirely depend on the panel and whether or not it had a facing.
This to me feels that I'm designing all of the clothing to be spectacular on it's own merit, and able to both stand alone as a design (particularly if the piece is multifunctional or reversible), as well as complimenting the secondary garments it's styled with in the collection, (statement red lingerie set), and also capable of being used in a styling exercise and mixing around the way the collection pieces are worn and styled together. Adding in details like the insertion embroidery stitch to designs can also be good because should I inevitably find myself running out of time, these finer details may be reduced for the sake of pragmatism.
Cracked Mirror Dress (and Crown)
I just love the historical techniques and craftsmanship in this statement piece!

Statement Patchwork Dress
This just really sets the upcycling theme that I'm personally developing in my own work.

Video
I really align with the formal that Margiela's collection is displayed in: I think that being digitised and in this case very cinematic really aligns with the mid/post pandemic atmosphere we find ourselves in, I love Galliano's explanation of intentions, concepts and techniques, and these are all things I'd like to reproduce in my own work.
Pattern Drafting and Toiles
Ideas...


Panels inserted into the bottom of dresses: Godets - wedges or similar would work well in the cream dress and statement mint dress but less well in the two toned print dress.
Corset
Patterns to use as a base for drafting from:
These are very similar with the only clear difference being the under/overbust. Once I start a first toile, I will be able to draw in new design lines if I want or need - possibly it will be best and easiest to use an overbust corset to start with so I know where to draw in the lines for the bra cups.
I think I like the shape in the seams of this corset best - the cut would be very different particularly once incorporating cups but I definitely like the mood of it.
I think it would be best to draft this piece with a fairly large back gap and a modesty panel - as we're not using it models anymore I've chosen to make the clothing closer to my own size, particularly so that I can wear the garments and final toiles and be more sustainable. However, having the ability to well fit a smaller model too is important to me.
I'm not entirely sure whether or not I want to use bra underwire in this corset - it sort of depends on whether or not it would fit in with the front button placket. However I do want to use boning within the corset so I may want to add underwire to match the structure of it.
I've ended up using this 'Tulip' Edwardian pattern:
by 'Aranea Black Corsets' - I've done this because while I intend to change all of the design lines, hems and seams anyway, starting off of a corset shape is really useful to me. The creator has made is clear that the corset pattern is free and free for use for adapting and selling, and that she's derived it entirely unadapted from a historical pattern book, so I don't feel that I'm using intellectual property. I have made a corset pattern starting from a block before, but this just allows me to be much more efficient.


I added a lot of room into the pattern hems so that I can go in and draw new lines soon, and insert the bust quarter cups. This toile doesn't fit my size 10 mannequin particularly well as it's too rigid to make the waist cinch properly, but once I draw in new design lines I'll fit it on myself for reference.

Strappy Panty Toile
This pattern is to be used on both the red statement lingerie, and the blue cyanotype silk.
Crochet Border Process
In the toile I used a FOE elastic border but if using sustainable elastic then will likely use a tunnel or folded hem instead.
(Note that I will need to experiment with using these seams in the gauze fabric to see that white rubber elastic doesn't show through in a bad way.)
Use a 2.5 mm hook and thin (1-2ply) wool yarn.
Sew an approx. 8mm distant blanket stitch along the edge.
Joint a slip knot into the chain stitch using slip stitch.
Stitch a line of single crochet - two in each space between blanket stitches.
Turn at and and chain st 1.
1 single crochet, in next blanket stitch space 5 double crochet. Single crochet in next blanket stitch space and repeat.
Single crochet in last space then stitch all tails in together.
(Try sampling 'wedding choker crochet lace' tutorial technique too.)
Note: for bra cups I adapted a pattern using the same ply of wool using a 4mm hook - I think for the final I'd use a 3 or 3.5mm hook instead so the lace was less loose.


Garter Belt
I started drafting this off of a waist measurement, making an elasticated hook and eye close to go on the back. It's starting to make the shape that I want but the scale is all wrong and doesn't flatter the waist or other pieces at all yet. But once I've fixed the pattern this will be a very quick toile to make.


Next Week Goals
My goals for the next week are to focus on making all of the zero waste primary garments patterns and first toiles, starting from half scale at some points.
Patterns still to do:
- Half toned silk slip
- Cream dress (adapt from silk slip)
- Statement dress and sleeves
- Black ruched bra set
Patterns to adapt:
- Gloves
- Garter belt
- Corset
- ZW fan laced skirt


Comments